


How to (and why) go serverless
Learn with me how to (and why) build a FullStack app with AWS Amplify and Next.js


For the past week or so I've been researching quite a lot about software architecture. And I have a BIG essay coming. Yet I am only like halfway through.
So I decided to take a little bit of what I learned about Serverless and put it into a separate post. I want to build something right now. Instead of blabbering theoretical gibberish.
Ok, I ended up with some theoretical gibberish. But only a little.
So let's get our feet wet, shall we?
I will explain with quite some detail what I learned about Serverless architectures on the aforementioned post. Right now, I will just take some time to ramble about the why. Then, we will get straight into the hands-on tutorial. If you are not interested in my ramblings, feel free to skip the following section.
You will break my heart. But feel free to skip.
But first, why?
Let me tell you how I think about the whole "Serverless" thing. There's ovbiously always a server somewhere. Its just that you don't need to think about that. Instead, you need to think about higher level constructs.
Let me paint an analogy.
If you are familiar with the functional style on JavaScript. You are probably familiar with the Array.prototype.map() method. Mathematically, you are dealing with a functor over the category of Arrays. (read this if you are curious)
Which doesn't really mean anything if you are not familiar with the maths. But if you do, the phrase "a functor over the category of arrays" yields a lot of meaning.
And I mean A LOT. Functors are a mathematical way of talking about analogy. They are a way of transforming something from one domain to another, while preserving its structure, at least some of it. In the case of JS Arrays, the structure that is preserved is the "ordering" of elements, over the domain transformation defined by the function you pass into map. So the input and output arrays are analogous like that.
But requires you to think in more abstract terms. The map() method is much more than just syntactic sugar over a clever for loop. But to get why, you will need to invest some time understanding what functors are.
Having said that. It doesn't really matter if you use a for or if you use map(). The JavaScript runtime will always iterate over the elements of an array one-by-one. The fancy abstraction is a cognitive tool for us, not for the computer. Being able to think at a higher level of abstraction allows us to do more with less code and with less effort and time.
Well, in my mind the whole Serverless thing is analogous to that. You don't have to worry about lower-level details. Thus allowing you to only focus on your business logic. The thing that actually provides the particular functionality of your app.
But you are forced to reason at a higher level of abstraction. Things like serverless functions and "edge computing" are not quite as concrete as an Express.js route handler on a Node server, for example. But they could be used for the same purposes.
Keeping up with the analogy, it doesn't really matter if you use AWS Lambda or your own Node/Express server. It will always boil down to some concrete procedural instructions on a server somewhere.
You may now reasonably be asking, Why would I want to go through the trouble of using harder-to-reason-about higher-level constructs over the concrete alternative?
If you use managed Serverless services you get extra features, like automatic scaling for free, in as much as you do not have to do anything to take advantage of them. Achieving the same with your own Node server is not trivial. At all.
Another big benefit is that you are only charged for the computing time you actually use. Instead of renting a server for a set period of time, whether you use it or not.
Hopefully that paints a good picture of why Serverless may be a good idea. But I should point out that it is not the best solution for every use case. As anything in software architecture, it depends...
...
I was lucky enough to be a Math major at some point in my life (and would love to go back and finally get my degree XD). I got the chance to study algebra and category theory. So this way of thinking is really comfortable for me :P
But the concrete hands-on coding is not!
So that's why I will focus on building actual projects on this blog. I will start by building a project to introduce myself to AWS. (in between the bigger SaaS project I have going on). Let's get into it!
The basic ideas behind AWS
The AWS ecosystem exposes a lot of services that you can take advantage of while only paying for what you actually use. That is, they are services, not libraries nor frameworks. And they are pay-as-you-use, not subscriptions nor rents.
Most of them have very generous free tiers, so don't you worry!
The underlying infrastructure is automagically handled for you. And there are no "setup" costs whatsoever.
There is a problem though. They are hard to grasp. What the heck is "Cognito", "SQS", "Lambda" or "AppSync"?
Well, they are individual services that, like Lego bricks, allow you to build things like authentication (Cognito). But you may find it easier to think in terms of categories instead of services. So you would want to have AWS handle authorization, to handle a GraphQL API, and so.
Wouldn't it be nice to have something like:
import {Auth} from "FancyAmazonMagicModule.js"

Auth.handleItForMe()
Well, you can't. But not by much!
Enter AWS Amplify
Amplify is a framework for building full stack application with AWS. Consisting of several components. Let's list some of them.
AmplifyCLI
This is a command line utility that you can use to easily configure and setup AWS services that you will use in your app. It is very straightforward to use.
Amplify Library
A set of modules, with components for frontend frameworks or libraries like React or Next, to easily consume the AWS services you have set up for your app.
Amplify Console
This is the command hub for your AWS apps built with amplify. You can see usage analytics and perform administrative tasks here.
Amplify Hosting
A hosting service by AWS that you can use to deploy your app. Uses a git-based workflow, so it is very easy to use.
Using AWS Amplify and Next.js to build an App
Let's build a simple app with AWS Amplify and Next.js. The basic steps we will follow are the following
- Create and set up an AWS account and Install Amplify CLI
- Create a Next.js project and import Amplify libraries
- Use Amplify CLI to setup the AWS services you will need
- Use the modules form Amplify library in your app to consume the services
- Build your app
- Deploy!
Sign up to AWS and Using Amplify CLI
I am gonna assume you have already signed up for an AWS account. Once you have, you can install the amplify CLI globally via npm.
npm install -g @aws-amplify/cli
I am also gonna assume that you know how to work in the "Node style" (with npm). And have Node.js installed.
And you will set it up with the configure command.
amplify configure
It will ask you to sign in into the AWS Console. Once you do, you will need to create an IAM user
IAM stands for Identity and Access Management. And is the way Amazon uses for dealing with users and user permissions, from the same organization. So if an organization has just one AWS account, they can have several employees using the account to build.
It will ask you for your preferred region and an username for the Amplify IAM user.
Specify the AWS Region
? region:  us-east-1
Specify the username of the new IAM user:
? user name:  jorch-test
Complete the user creation using the AWS console
After that, it will take you to the AWS Console to continue the process. Just make sure to create a user with the AdministratorAccess-Amplify policy enabled. That will allow the IAM user you just created to use Amplify to provision AWS services for your apps.
Then AWS Console will give you both an accessKeyId and secretAccessKey that you will need to input on the terminal to finish configuring AmplifyCLI.
Enter the access key of the newly created user:
? accessKeyId:  ********************
? secretAccessKey:  ****************************************
This would update/create the AWS Profile in your local machine
? Profile Name:  default

Successfully set up the new user.
Please note that it will be the only and last time that AWS will show you those particular keys. But you can always create new ones.
Now you are all set up and ready to start building fullstack apps with AWS and Amplify!
Amplify and Next setup
First, create a new Next.js project:
npx create-next-app my-awesome-app

cd my-awesome-app
At this point, if you run npm run dev or yarn dev you should see your boilerplate Next project running. You should see the "Welcome to Next.js" page.
...
To set up the "backend" with AWS we just need to init it with Amplify CLI. From your project's root run:
amplify init
It will ask for some info, but it will be able to infer most of the defaults given that you are using Next.
Note: It is recommended to run this command from the root of your app directory
? Enter a name for the project myawesomeapp
The following configuration will be applied:

Project information
| Name: myawesomeapp
| Environment: dev
| Default editor: Visual Studio Code
| App type: javascript
| Javascript framework: react
| Source Directory Path: src
| Distribution Directory Path: build
| Build Command: npm run-script build
| Start Command: npm run-script start

? Initialize the project with the above configuration? Yes
Using default provider  awscloudformation
? Select the authentication method you want to use: (Use arrow keys)
❯ AWS profile
  AWS access keys
Once its done asking questions, let it do its thing for a short while.
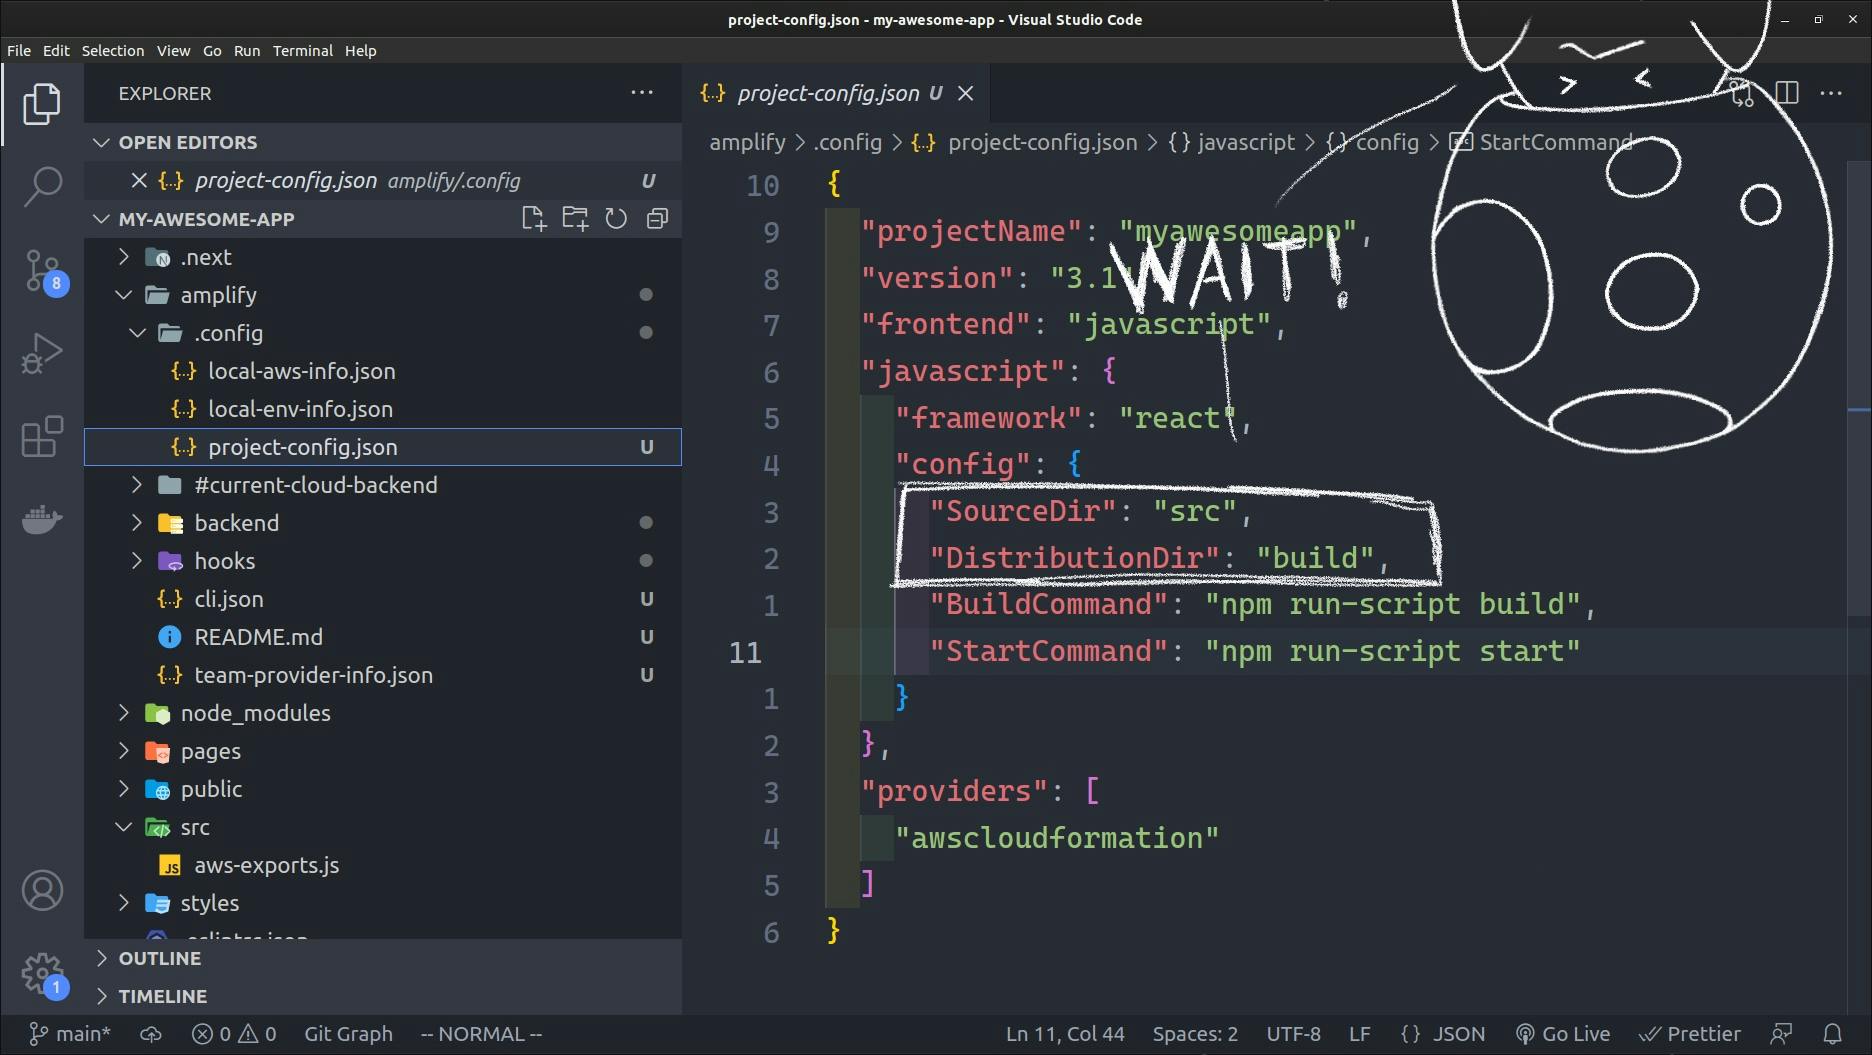
Ooopss! I made a mistake. I'm using Next.js, not plain React. There are some differences. The src in Next is the root of the project. Andbuild should be /.next. Luckily it is very easy to fix with Amplify.
amplify configure project
Will run the configuration questionnaire again.
? Which setting do you want to configure? Project information
? Enter a name for the project myawesomeapp
? Choose your default editor: Visual Studio Code
? Choose the type of app that you're building javascript
Please tell us about your project
? What javascript framework are you using react
? Source Directory Path:  .
? Distribution Directory Path: .next
? Build Command:  npm run-script build
? Start Command: npm run-script start
Using default provider  awscloudformation


Successfully made configuration changes to your project.
Ok. That's better, take a look.
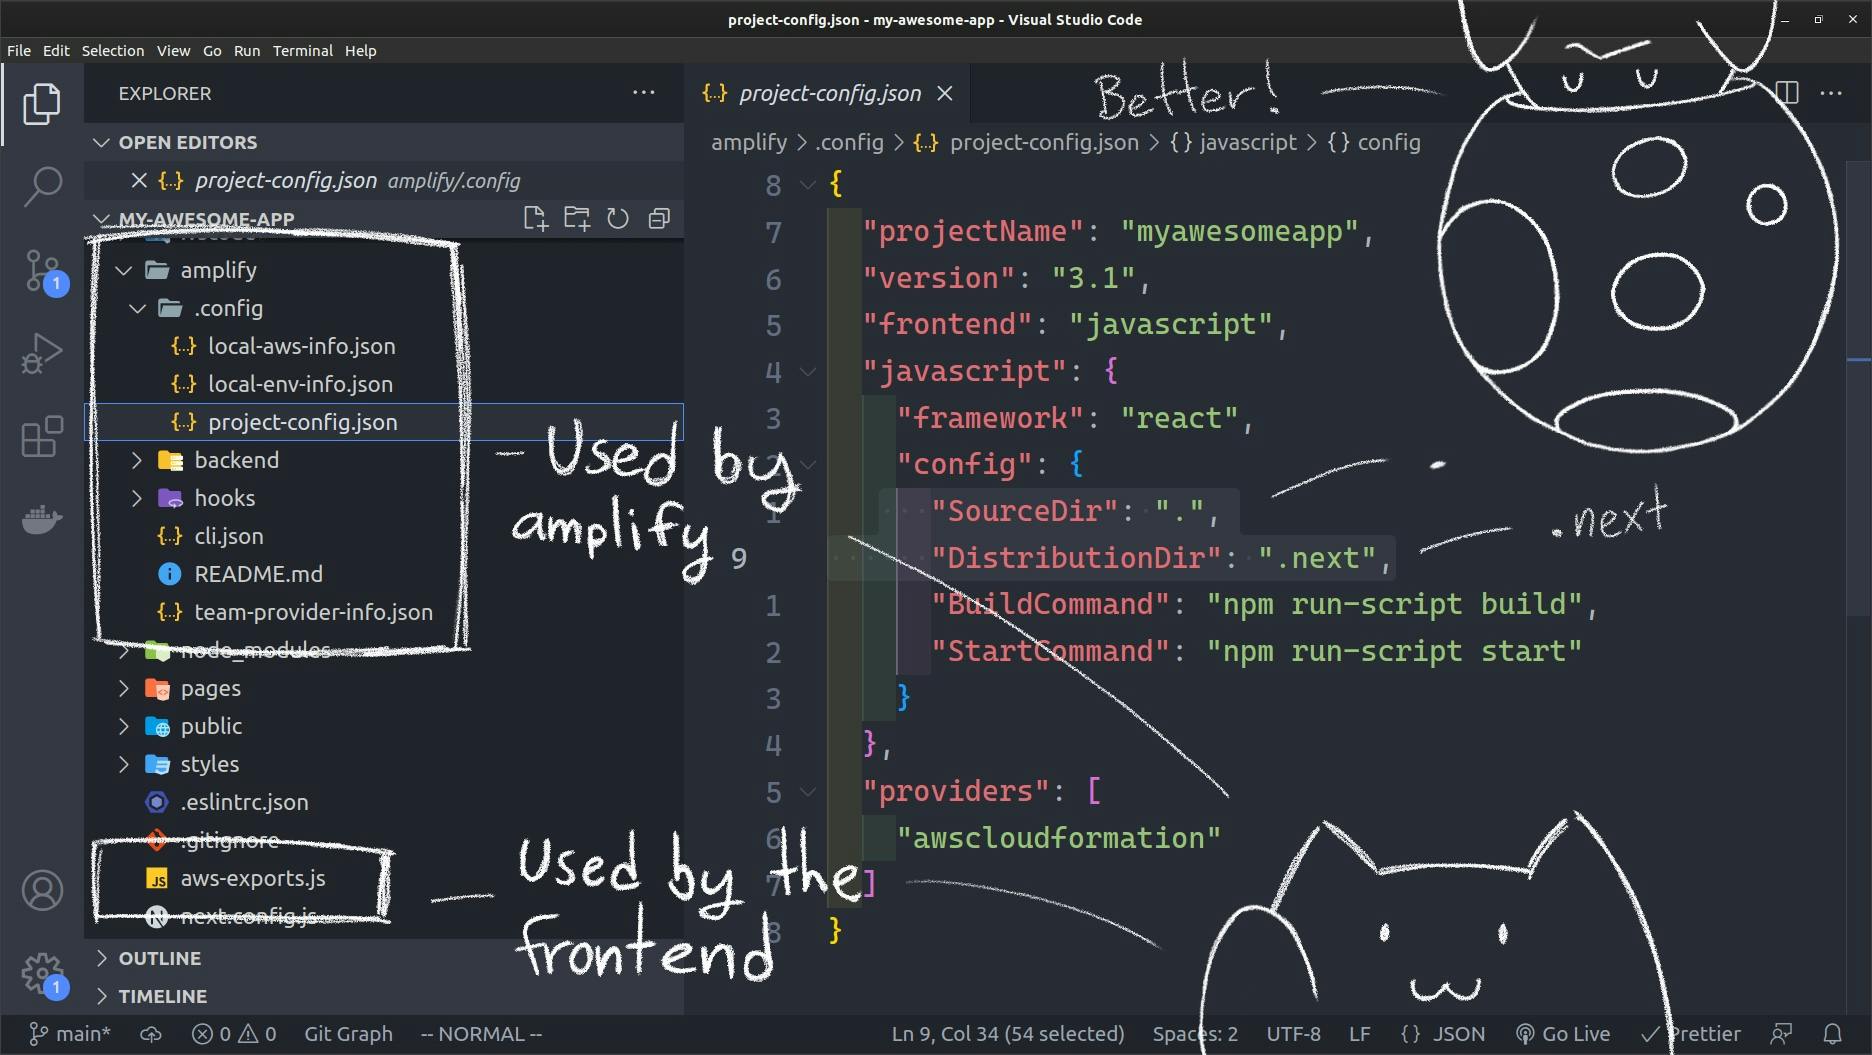
Amplify will create a folder ./amplify where it keeps all the info it needs to provision the AWS backend. As you add services this folder will get updated. It will also update the .gitignore file of your project.
Pay particular attention to the aws-exports.js file. The Amplify client needs this file to know how to use your AWS backend.
Please take note that amplify will automatically hide the /amplify/.config on VSCode by default on .vscode/settings.json but I changed that file to show it for the screeshot. So don't get scared when you don't see the .config folder! Ask me how I know!
Under the hood, a project will be created on your AWS Amplify Console. You jump into it by typing amplify console on the terminal
A small sidetrack: Infrastructure as Code
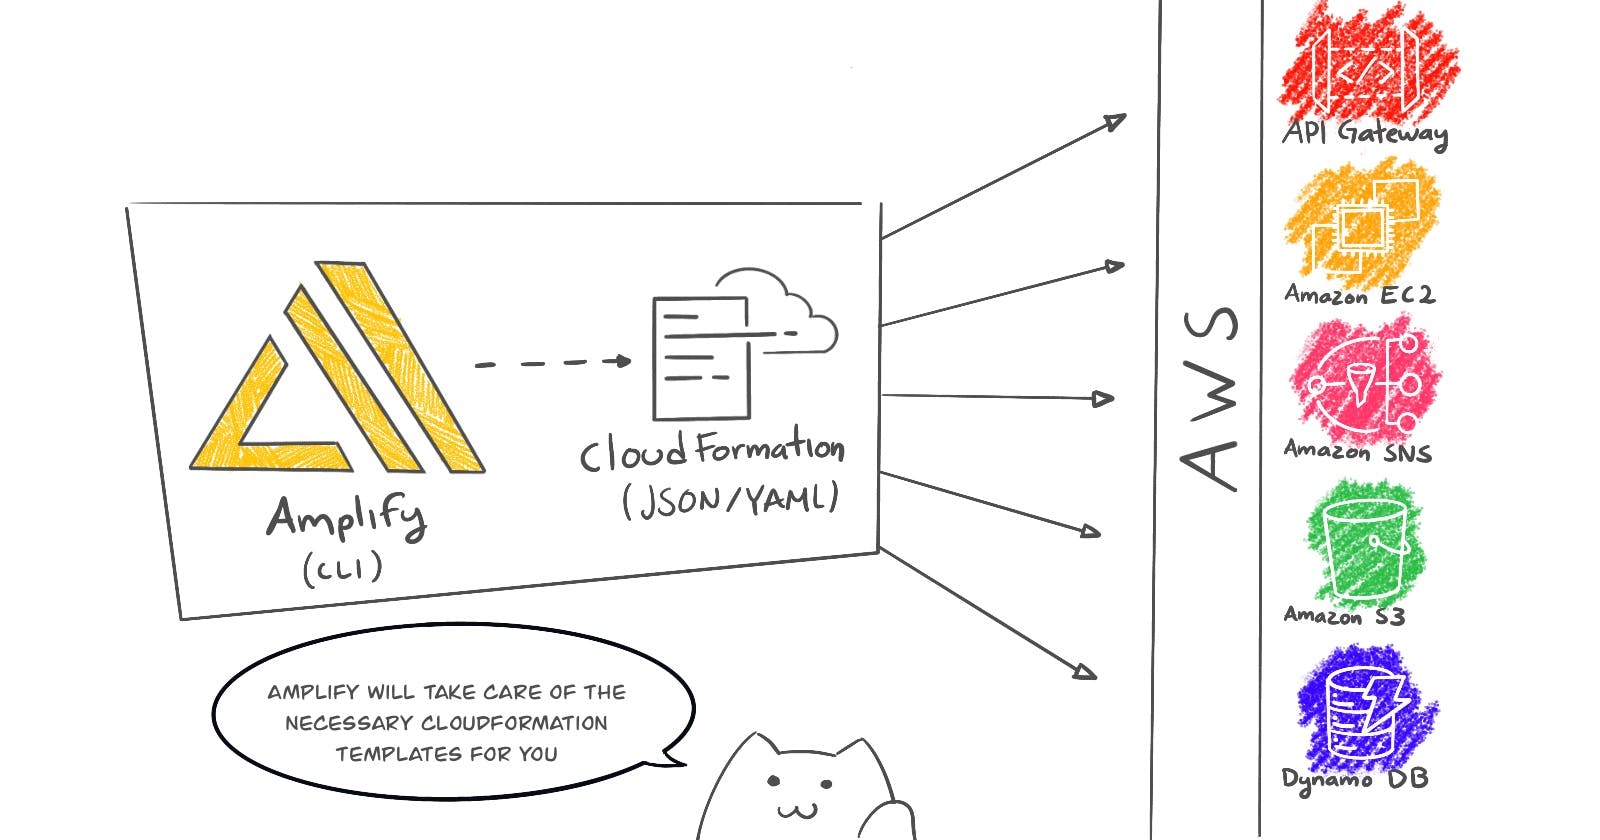
By the way. This approach of doing things is usually called "Infrastructure as Code". And as you can see, it really meshes well with the ethos of Serverless computing.
Under the hood, Amplify uses AWSCloudFormation, which allows you to create a template with JSON or YAML to describe the infrastructure you want, from the catalog of AWS services available.
You may also use AWS Cloud Development Kit (CDK) to define your infrastructure with common programming languages, like TypeScript. It also uses CloudFormation.
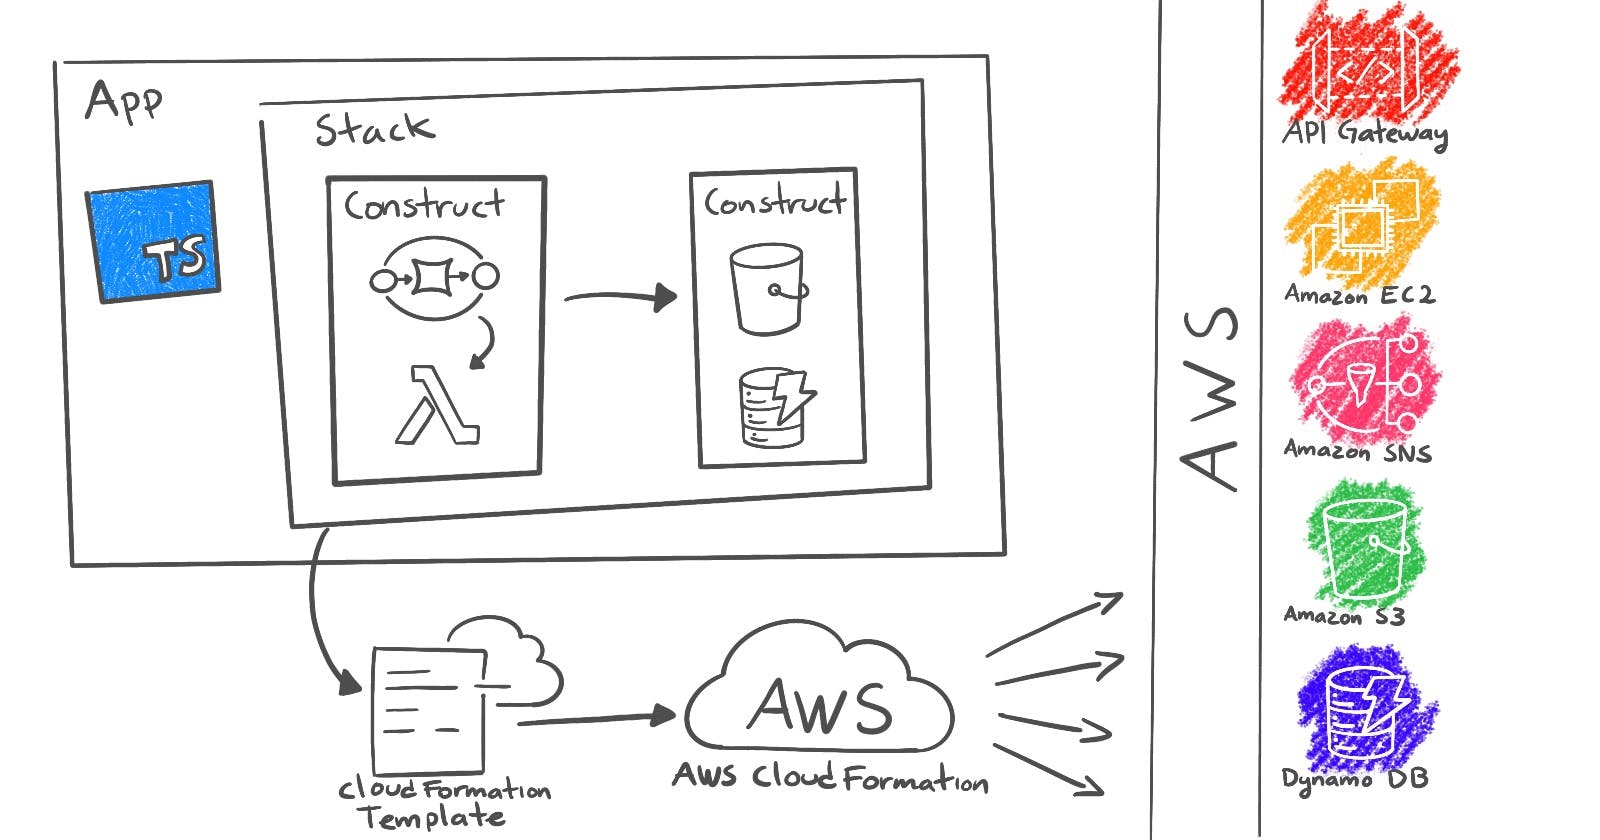
I will go through CDK in the future, but for now. Suffice to say that you can code "chunks" of your infrastructure, called "constructs". And can build your entire backend by piecing constructs together. Then, export the resulting CloudFormation template into AWS.
...
To finish setting up the project. Let's install the Amplify Libraries we need to use AWS from the client.
npm install aws-amplify @aws-amplify/ui-react@1.x.x
The aws-amplify package is the main npm package that we need for working with Amplify in our frontend apps. The other one contains React UI components that will be very useful as we build our app using AWS.
Create a GraphQL API in like seconds.
Up until this point everything we have done has been pretty generic. Pretty much any app will be setup like this. But now we have to think what it is that we want to do. Let's make a very unoriginal "Todo" app XD
We will need an API. Thus,
amplify add api
It will ask some questions. By now you know the drill.
? Select from one of the below mentioned services: GraphQL
? Here is the GraphQL API that we will create. Select a setting to edit or continue (Use arrow keys)
  Name: myawesomeapp
  Authorization modes: API key (default, expiration time: 7 days from now)
  Conflict detection (required for DataStore): Disabled
? Here is the GraphQL API that we will create. Select a setting to edit or continue Continue
? Choose a schema template: Single object with fields (e.g., “Todo” with ID, name, description)

...

GraphQL schema compiled successfully.
As we choose a GraphQL API, it will now ask if you want to edit the schema. If you choose yes, it will show the schema file. Here is what I'll use.
type Todo
@model
@auth(rules:[{allow: owner}, {allow:public, operations:[read] }]) {
  id: ID!
  title: String!
  content: String!
}
First note that there is a @model directive for the Todo type. This is an amplify-specific way of telling AWS to provision everything it will need to handle the implied data model. For example, it will create DynamoDB database tables for GraphQL types annotated with @model, and setup AWS AppSync to handle the corresponding API.
There is also an @auth directive with some rules. Again, this is for amplify to provision whatever it needs to handle who can do what with the database entries. Here we are telling amplify that only the owner will have full CRUD access to the data. While others can only read it.
Check the docs if you want to learn more about creating APIs with Amplify.
Finally, let's deploy the API. Type:
amplify push
It will push your API into the Cloud. After asking some more questions.
Building resource api/myawesomeapp
⚠️  WARNING: your GraphQL API currently allows public create, read, update, and delete access to all models via an API Key. To configure PRODUCTION-READY authorization rules, review: https://docs.amplify.aws/cli/graphql/authorization-rules


    Current Environment: dev

┌──────────┬───────────────┬───────────┬───────────────────┐
│ Category │ Resource name │ Operation │ Provider plugin   │
├──────────┼───────────────┼───────────┼───────────────────┤
│ Api      │ myawesomeapp  │ Create    │ awscloudformation │
└──────────┴───────────────┴───────────┴───────────────────┘
? Are you sure you want to continue? Yes
It will ask about the authentication and security configuration
Cognito UserPool configuration
Using service: Cognito, provided by: awscloudformation

 The current configured provider is Amazon Cognito.

 Do you want to use the default authentication and security configuration? Default configuration
 Warning: you will not be able to edit these selections.
 How do you want users to be able to sign in? Username
 Do you want to configure advanced settings? No, I am done.
Then it will ask about the GraphQL API
? Do you want to generate code for your newly created GraphQL API Yes
? Choose the code generation language target javascript
? Enter the file name pattern of graphql queries, mutations and subscriptions src/graphql/**/*.js
? Do you want to generate/update all possible GraphQL operations - queries, mutations and subscriptions Yes
? Enter maximum statement depth [increase from default if your schema is deeply nested] 2
Once its done, your API is live!
✔ Generated GraphQL operations successfully and saved at src/graphql
✔ All resources are updated in the cloud

GraphQL endpoint: # the url for the api endpoint
GraphQL API KEY: ********************************

GraphQL transformer version: 2
You can play with it by running
amplify console api
To open the AWS AppSync console.
What the heck just happened!
This one makes for a dramatic highlight of the power you can wield with this kind of tools. Under the hood Amplify provisioned everything you need for the API to work.
No data models and ODMs, or silly CRUD-ful mischievousness to worry about! AWS will figure all of that out for you!
Disclaimer: If only it were so simple. Nothing in software is a silver bullet. There are some tradeoffs. Can you guess which ones?
Create a Next.js frontend
Open ./pages/index.js to start building the frontend of the app. Let's first see what we need to import to tie everything together
//pages/index.js

import { AmplifyAuthenticator } from "@aws-amplify/ui-react";
import { Amplify, API, Auth, withSSRContext } from "aws-amplify";

import Head from "next/head";
import styles from "../styles/Home.module.css";

import awsExports from "../aws-exports.js";

import { createTodo } from "../src/graphql/mutations";
import { listTodos } from "../src/graphql/queries";

// Tell amplify to use our configured backend
Amplify.configure({ ...awsExports, ssr: true });
We import from aws-amplify the objects that will allow us to consume the backend. And we tell Amplify to use it by using Amplify.configure().
The awsExports object is the aws-exports.js file that Amplify generated back when we initialized out project.
The createTodo and listTodos objects are the GraphQL mutation and query, for our "Todo" model, respectively. I have a styles CSS file which is pretty much what Next.js generates by default, so don't worry too much about it.
The API and Auth objects will allow us to interact with the underlying AWS services we asked Amplify to set up for us.
We will also use the AmplifyAuthenticator react component to let Amplify handle the sign-in/sign-out as well as how to restore forgotten passwords and so. You may also do this manually, but I choose to do it this way for simplicity.
Finally, we will also have it so that the apps queries our API before it is sent to the client. Amplify has a convenient withSSRContext() utility for that. According to the docs, client-side credentials are passed to the server via cookies. withSSRContext creates an instance of Amplify scoped to a single request using those credentials. So the server can, in this case, make the request to or API and fetch the todos for server side rendering.
// We want to query our GraphQL API before sending the page to the client
export async function getServerSideProps({ req }) {
  const SSR = withSSRContext({ req });
  const response = await SSR.API.graphql({ query: listTodos });

  return {
    props: {
      todos: response.data.listTodos.items,
    },
  };
}
Here is the main component
export default function Home({ todos = [] }) {
  return (
    <div className={styles.container}>
      <Head>
        <title>Todo Super App</title>
        <link rel='icon' href='./favicon.ico' />
      </Head>

      <main className={styles.main}>
        <h1 className={styles.title}>Todo App with AWS</h1>
        <AmplifyAuthenticator className={styles.auth}>
          <p className={styles.description}>
            <code className={styles.code}>{todos.length}</code> todos
          </p>

          <div className={styles.grid}>
            {todos.map((todo) => (
              <a
                className={styles.card}
                href={`/todos/${todo.id}`}
                key={todo.id}>
                <h3>{todo.title}</h3>
                <p>{todo.content}</p>
              </a>
            ))}
          </div>

          <div className={styles.card}>
            <h3>New Todo</h3>
            <form onSubmit={handleCreateTodo}>
              <fieldset>
                <legend>Task name</legend>
                <input defaultValue={"Enter a name..."} name='title' />
              </fieldset>
              <fieldset>
                <legend>Task description</legend>
                <input defaultValue='What is the task?' name='content' />
              </fieldset>

              <button>Create Post</button>
              <button type='button' onClick={() => Auth.signOut()}>
                Sign out
              </button>
            </form>
          </div>
        </AmplifyAuthenticator>
      </main>
    </div>
  );
}
Finally, we have a handler for when we need to create a new Todo
async function handleCreateTodo(event) {
  event.preventDefault();

  const form = new FormData(event.target);

  try {
    const { data } = await API.graphql({
      authMode: "AMAZON_COGNITO_USER_POOLS",
      query: createTodo,
      variables: {
        input: {
          title: form.get("title"),
          content: form.get("content"),
        },
      },
    });
    window.location.href = `/todos/${data.createTodo.id}`;
  } catch ({ errors }) {
    console.error(...errors);
    throw new Error(errors[0].message);
  }
}
Here the only relevant part is that we are using await API.graphql() which does exactly what it looks like. It takes an object describing a query and then does the query for you.
It will then take us to /todos/:id which we haven't written yet. Here it is. It is pretty much the same in terms of how to handle the backend.
import { Amplify, API, withSSRContext } from "aws-amplify";
import awsExports from "../../aws-exports";

import Head from "next/head";
import { useRouter } from "next/router";
import styles from "../../styles/Home.module.css";

import { deleteTodo } from "../../src/graphql/mutations";
import { getTodo, listTodos } from "../../src/graphql/queries";

Amplify.configure({ ...awsExports, ssr: true });

export async function getStaticPaths() {
  const SSR = withSSRContext();
  const { data } = await SSR.API.graphql({ query: listTodos });
  const paths = data.listTodos.items.map((todo) => ({
    params: { id: todo.id },
  }));

  return {
    fallback: true,
    paths,
  };
}

export async function getStaticProps({ params }) {
  const SSR = withSSRContext();
  const { data } = await SSR.API.graphql({
    query: getTodo,
    variables: {
      id: params.id,
    },
  });

  return {
    props: {
      todo: data.getTodo,
    },
  };
}

export default function Todo({ todo }) {
  const router = useRouter();

  if (router.isFallback) {
    return (
      <div className={styles.container}>
        <h1 className={styles.title}>Loading...</h1>
      </div>
    );
  }

  async function handleDelete() {
    try {
      await API.graphql({
        authMode: "AMAZON_COGNITO_USER_POOLS",
        query: deleteTodo,
        variables: {
          input: { id: todo.id },
        },
      });

      window.location.href = "/";
    } catch ({ errors }) {
      console.error(...errors);
      throw new Error(errors[0].message);
    }
  }

  return (
    <div className={styles.container}>
      <Head>
        <title>{todo.title} - Todo App</title>
        <link rel='icon' href='/favicon.ico' />
      </Head>
      <main className={styles.main}>
        <h1 className={styles.title}>{todo.title}</h1>
        <p className={styles.description}>{todo.content}</p>
      </main>
      <footer className={styles.footer}>
        <button onClick={handleDelete}>Delete Post</button>
      </footer>
    </div>
  );
}
The only noteworthy aspect is the handleDelete handler. It will use the API object to send a delete query for the todo's id. And then it will take us to the home /.
...
If you play for a little bit with the app you will see that it has a very complex sign-up/sign-in flow. But I only used a single component to have it work that way.
Deploying and setting up CI/CD
Finally, lets deploy our app. We will use Amplify Hosting, of course! Can you guess how you would add hosting? Exactly!
amplify add hosting
It will ask some questions
? Select the plugin module to execute Hosting with Amplify Console (Managed hosting with custom domains, Continuous deployment)
? Choose a type Continuous deployment (Git-based deployments)
? Continuous deployment is configured in the Amplify Console. Please hit enter once you connect your repository
Then it will take you to the Amplify console. Choose Hosting environments tab and select from where to pull the project.
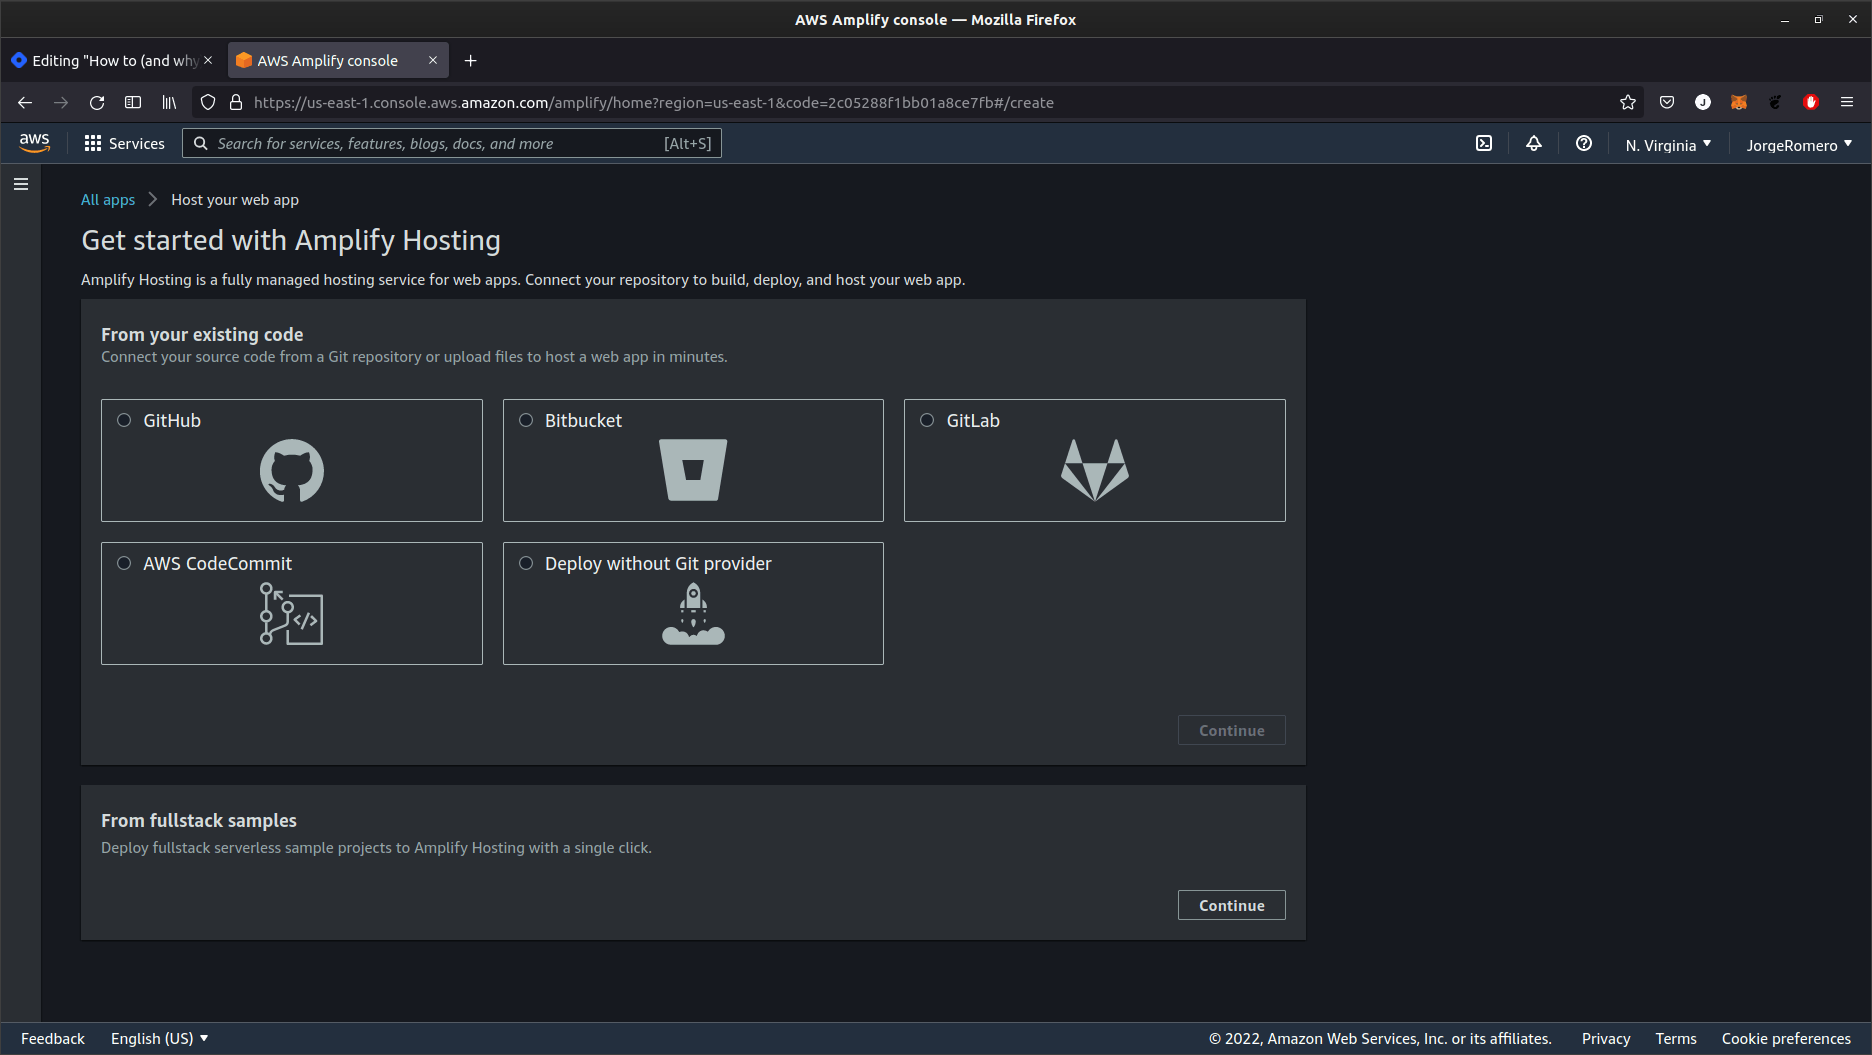
I'm using github. Click "select branch" and follow the instructions to authorize with github. Then just enter the repo.
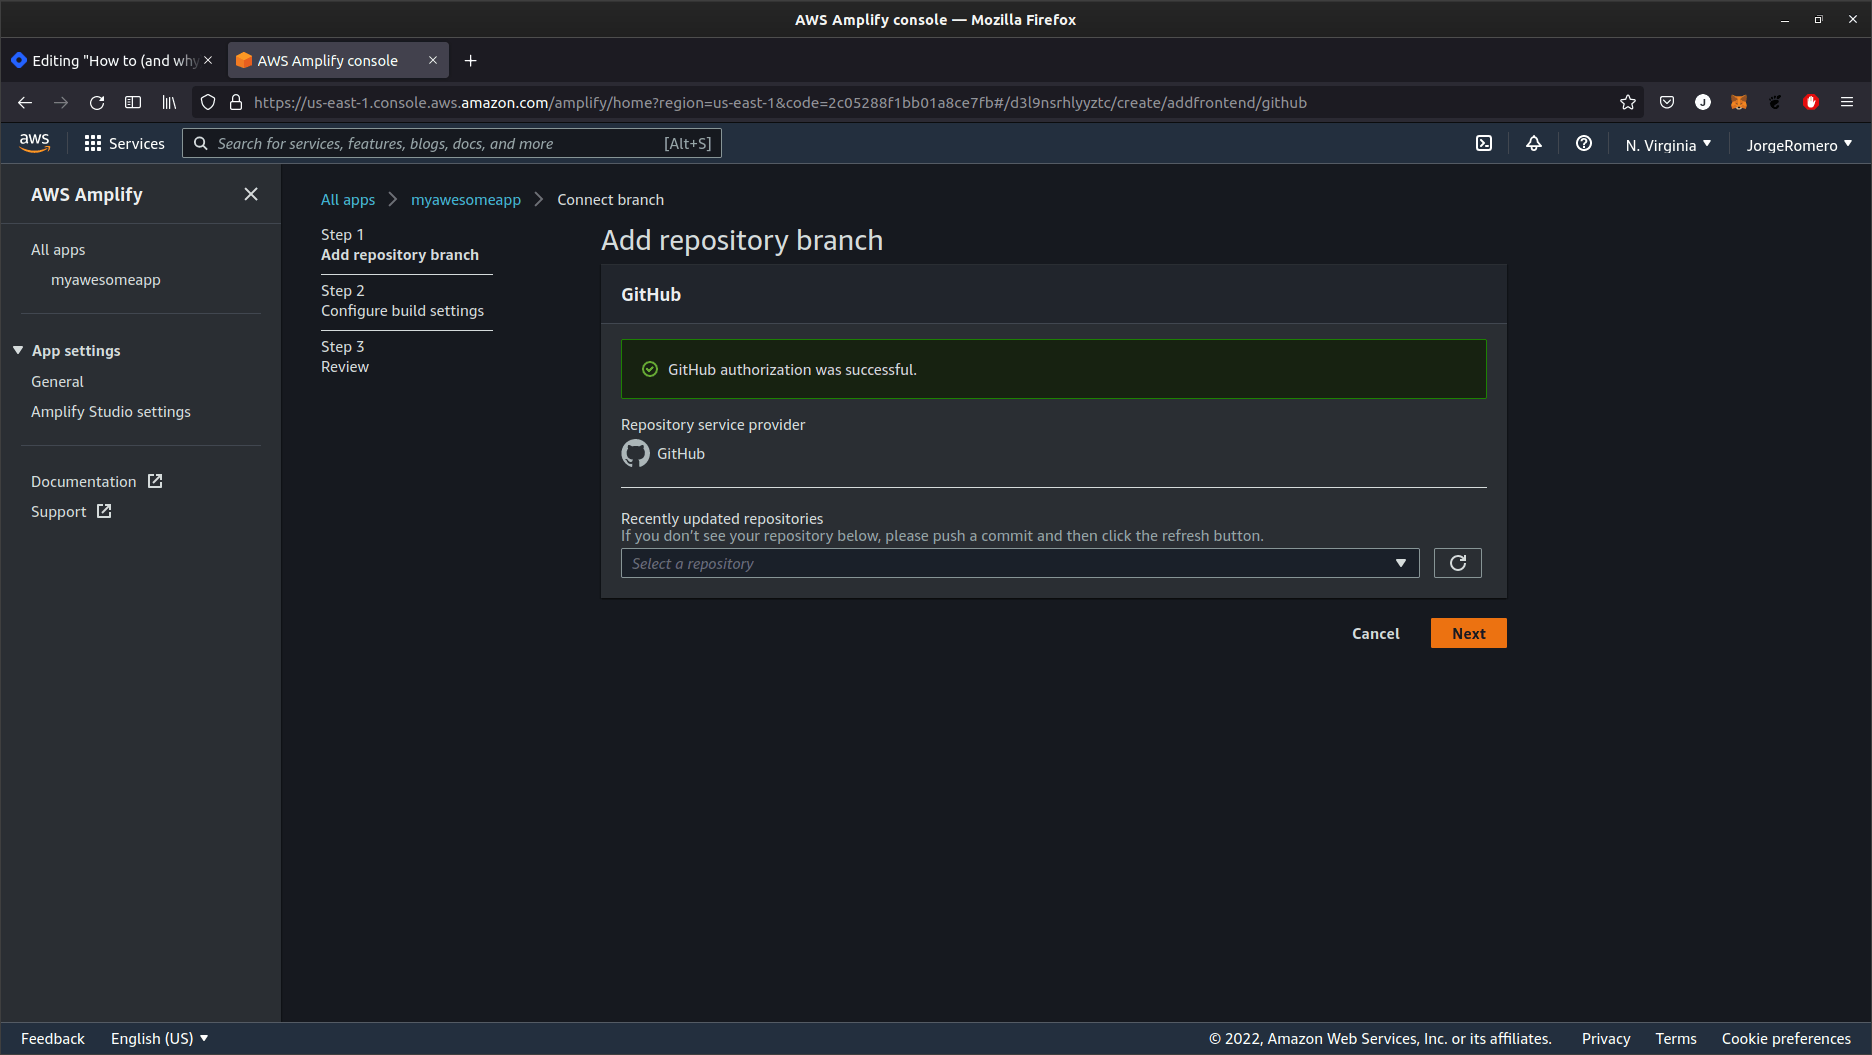
Tumble your way through the instructions and eventually you will have a deployed app!
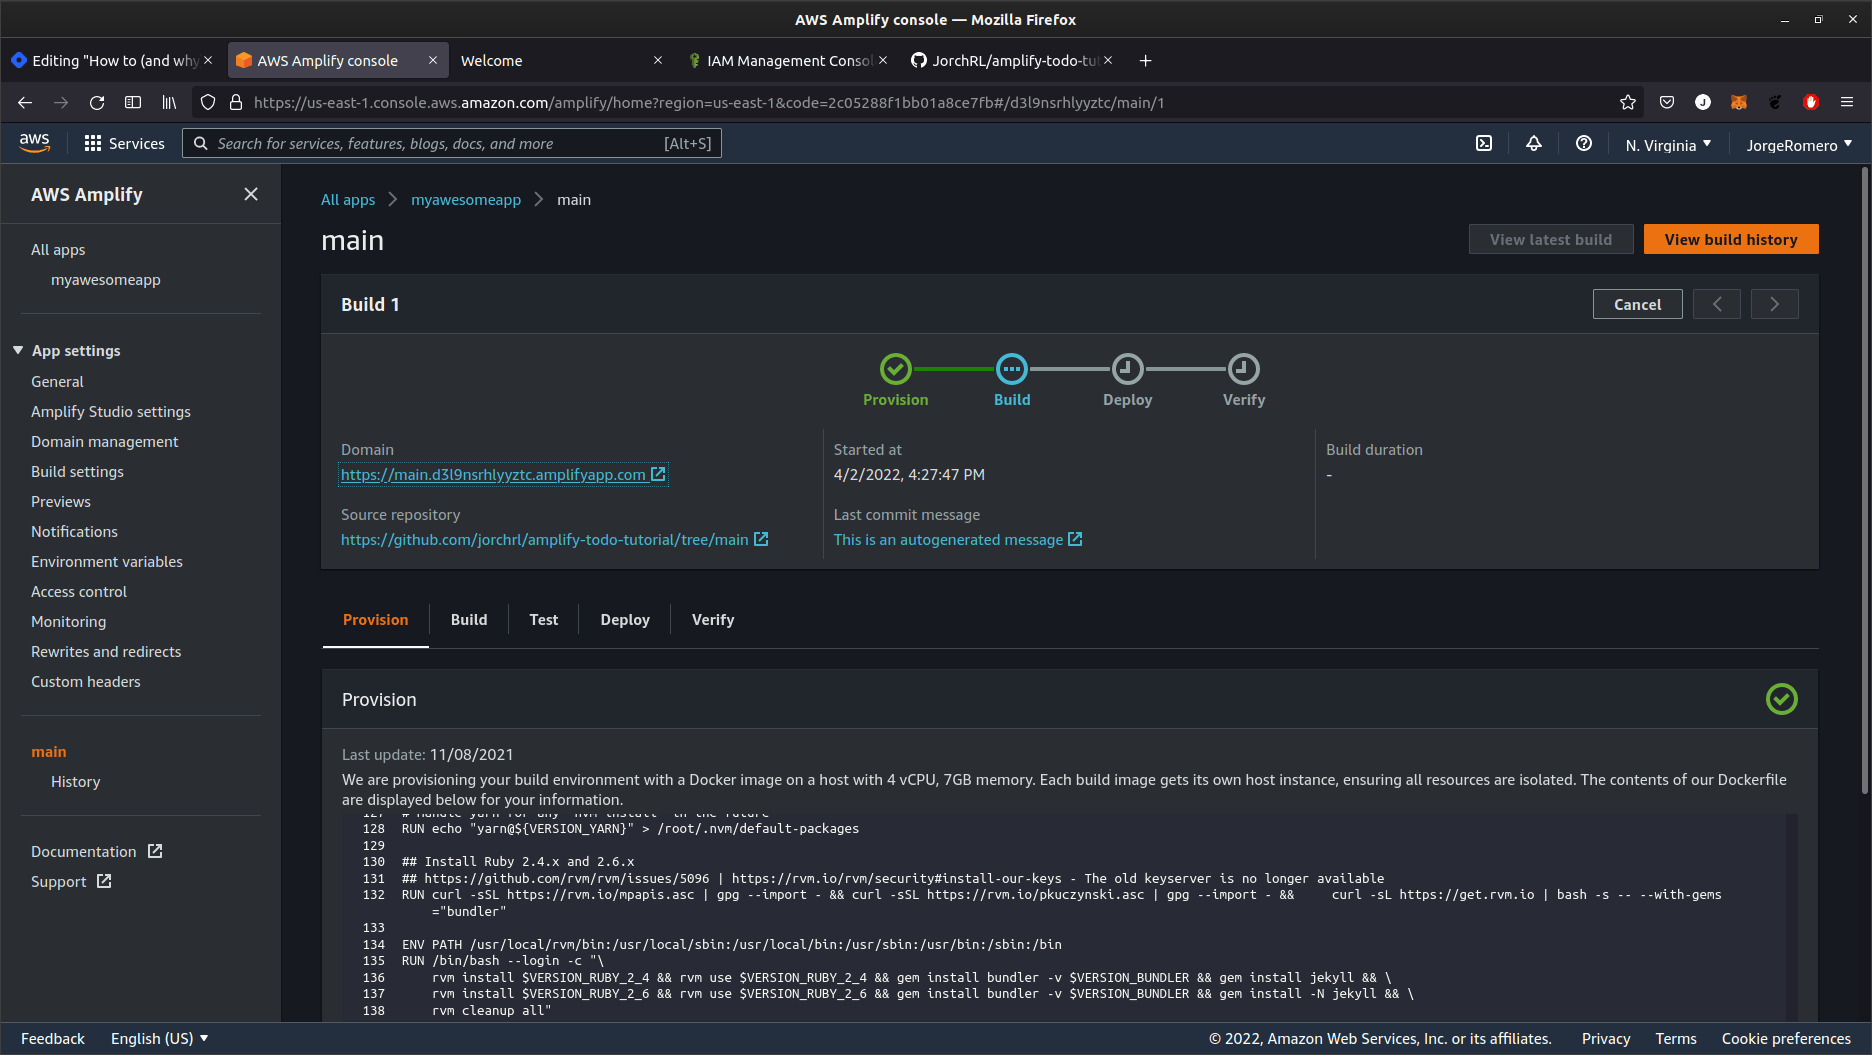
Once you select the repo and let AWS start the build process, you will see this in the terminal.
Amplify hosting urls:
┌──────────────┬────────────────────────────────────────────┐
│ FrontEnd Env │ Domain                                     │
├──────────────┼────────────────────────────────────────────┤
│ main         │ https://main.d3l9nsrhlyyztc.amplifyapp.com │
└──────────────┴────────────────────────────────────────────┘
It will take a while to build.
Finally, here is the app
And here's the GitHub Repo
There are some caveats though
Everything in software architecture is a tradeoff. AWS Amplify makes it almost trivial to use the notoriously confusing AWS ecosystem.
It does a lot of stuff under the hood. And it works pretty well... until it doesn't. If you throw in a lot of stuff without knowing what is what, you won't have the faintest idea on how to even start debugging when things go awry.
So tools like this one can turn out to be quite the sharp double-edged sword. The more you rely on "bootstrapping" software, the more likely you are of check-matting yourself.
That is, if you don't understand what is happening under the hood.
Just to be completely transparent. I am just learning this myself. I followed a bunch of tutorials just to be able to piece this one together. You can find other tutorials online. Better tutorials.
So I want to be extremely careful, to avoid going overboard. That being said, I take a lot of care about the information I share here.
Why do I care about this stuff?
I don’t really like front end that much, to be honest (mainly because I suck at it). And I figured I will focus on learning what I need for the job I want. The big-picture architectural side of software meshes much better with how my mind works.
Most jobs I’ve seen that involve architecture, Serverless and the Jamstack, are senior fullstack engineer positions. So I’m aiming for that. As arrogant as it might sound coming from someone with 0 industry experience.
So I figured I will build my experience myself by building bigger "fullstack" projects on this blog. Which is great for my blogging, as I now have a narrower focus! I also want to get into Web3 :D
Alas, I don’t come into software empty handed. I know the value of my abilities. Coding is trivial once you reach a certain threshold. And I am way past that point. I can research the rest by myself.
I have low self-esteem, not a lack of self-awareness!
:D
I mean, good, persuasive writing demands boldness.
Epilogue.
Well, that was another really big one! I learned a ton. And I mean A TON!
Last week or so I wasn't even aware that AWS existed! Nor I had any idea about "fullstack" other than the cliche Node/Express and MongoDB run-of-the-mill tutorial project.
But this? This was something else!
Did I miss anything? Please let me know!
Maybe follow me on Twitter?